Automate HFP
Overview
In this lab we will learn how we can use SevOne automation capabilities to automate actions in SevOne without the need of coding.
In this lab we will configure RNA to change the polling frequency of an object in SevOne when an alert is triggered on that object. For example, this could be used when SevOne detects that a device stopped replying to ping (ICMP). As the normal polling frequency is 5 minutes, that would mean that when the device comes back up (starts replying to ICMP again), it might take up to 5 minutes (polling frequency) for SevOne to detect it.
Therefore, configuring the following workflow, we would be able to change the polling frequency to 10 seconds (instead of 5 minutes), when we detect that the device went down, in order to detect when the device comes back up faster (up to 10 seconds, compared with the 5 minutes by default).
This configuration can be used in multiple situations, not only on ICMP, for example:
- When errors appear on an interface
- When traffic is higher than 90% so we get a more clear view of the traffic spikes
- When CPU is high, so we get a closer look when the CPU becomes less busy
- When firewall rule hit counts goes abnormaly high, to understand if this is some kind of attack
High Frequency Polling
- Log into Automation platform
- Go to Authentications
- Click Create Authentication
- a. Name: SevOne
- b. Service: SevOne
- c. Protocol: http:// (<-- important)
- d. Host: 10.0.0.10
- e. Username: admin
- f. Password: SevOne

- Go to Workflows
- Click Create Workflow
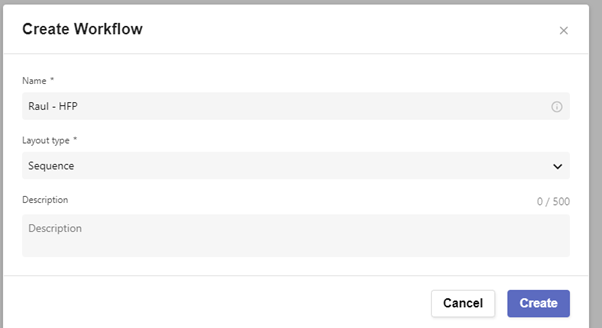
- a. Name: Your Name – HFP
- b. Layout type: Sequence
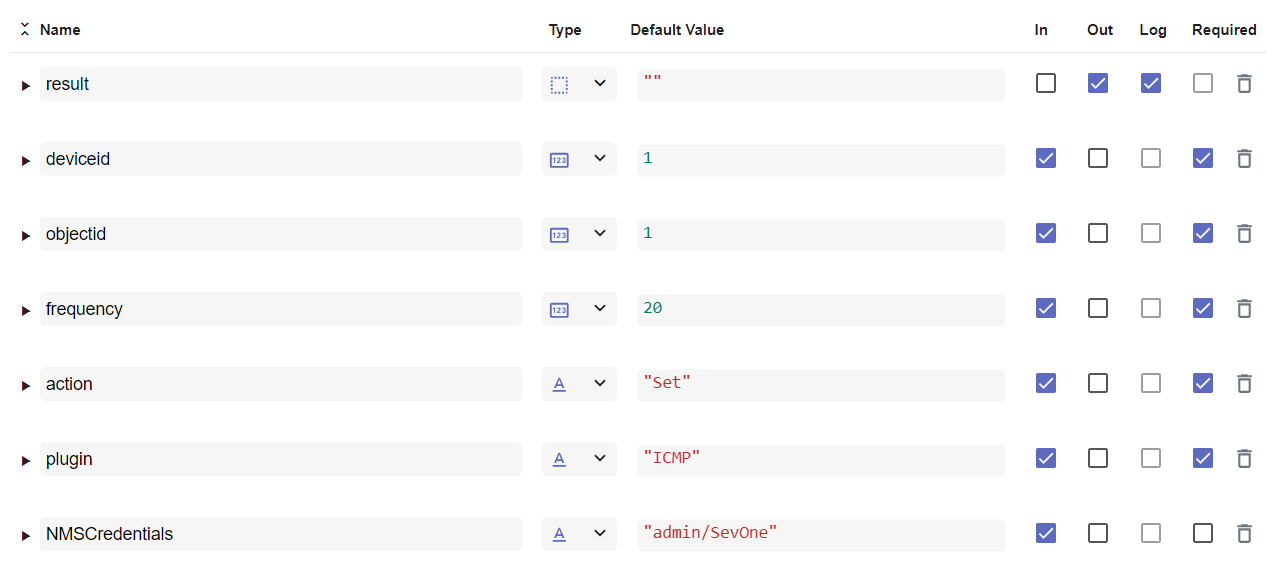
Add variables to Start
- a. Name: deviceid -> Type: Number -> Default Value: 1 -> In -> Required
- b. Name: objectid -> Type: Number -> Default Value: 1 -> In -> Required
- c. Name: frequency -> Type: Number -> Default Value: 20 -> In Required
- d. Name: action -> Type: String -> Default Value: "Set" -> In -> Required
- e. Name: plugin -> Type: String -> Default Value: "ICMP“ -> In -> Required
- f. Name: NMSCredentials -> Type: Authentication (SevOne) -> Default Value: “admin/SevOne“ -> In
- Change view to Flow

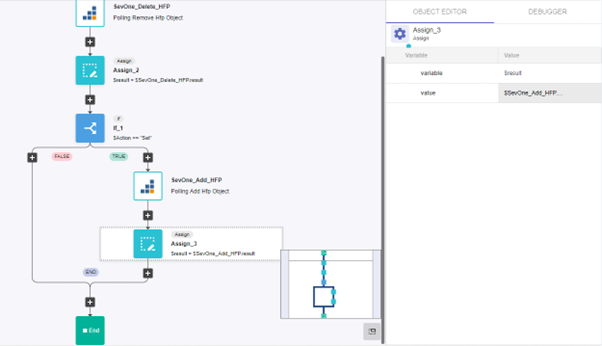
On the left hand side panel, search for SevOne -> REST v3 -> Polling -> Polling Remove HFP Object
- a. Drag and drop that building block to the first position in the workflow after Start
- b. Change Name of building block to SevOne_Delete_HFP
- c. Complete the details in Object Editor
- d. AuthKey: $NMSCredentials
- e. deviceId: $deviceid
- f. objectId: $objectid
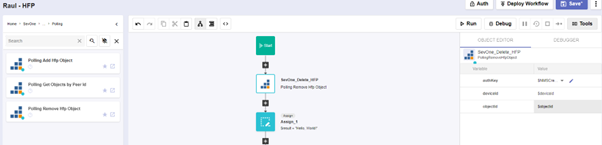
- On the left hand side panel, go to Common -> Assign and click on the star icon to make it a favourite

- Click on the + icon under SevOne_Delete_HFP and select Assign
- a. Variable: $result
- b. $value: $SevOne_Delete_HFP.result
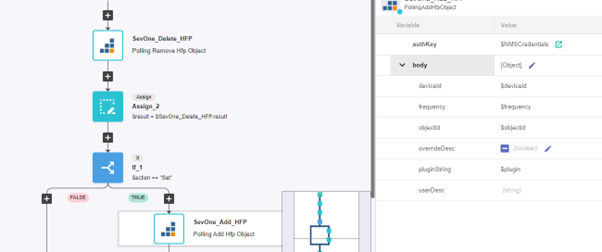
- On the left hand side panel, go to Common -> If and move it under the last building block
- a. Condition-> $action == "Set"
- b. On the TRUE branch add building block SevOne -> REST v3 -> Polling -> Polling Add Hfp Object
- i. Name of the building block: SevOne_Add_HFP
- ii. authKey: $NMSCredentials
- Body:
- a. DeviceId: $deviceid
- b. Frequency: $frequency
- c. ObjectId: $objectid
- d. pluginString: $plugin
- Click on the + icon after the SevOne_Add_HFP building block statement and add ‘Assign’
- a. Variable: $result
- b. $value: $SevOne_Add_HFP.result
- Delete any other building block after the one you just created (There might be another Assign building block with ‘Hello World’ that we don’t know, so please remove it)
Save workflow
Go to APIs
Click on Create API
- a. Name: hfp
- b. Authentications
- i. Authentication: API Keys
Click ‘Add API Key’
Name: hfpkey
- ii. Copy the api key for later use
- c. Click ‘Create’

- d. In workflow deployments, click ‘Create’
    - i. Workflow -> Choose the workflow you created clicking on the folder icon on the top right side of that field
    - ii. Stage - > Click on + icon -> leave everything as it is, click Save
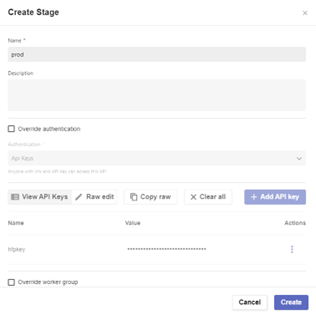
- iii. Endpoint -> Click on + icon
- Change Path to /SevOneHFP
- Method: POST
- Click ‘Save’

- e. Click **Deploy**

Review
To make sure this is working as expected, we have a few ways to test it. The first thing we will do is click on the Swagger UI available on the current page.
To test it, first we will configure the authorization by clicking on Authorize and pasting the Key that we saved before.
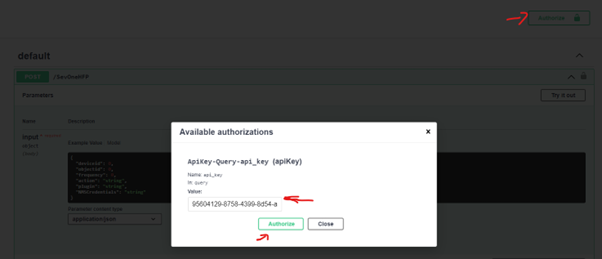
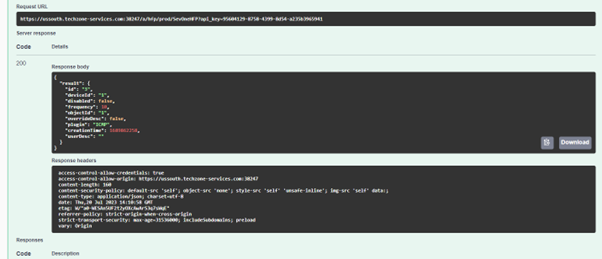
Click ‘Close’ Now we can test if this API is working, for example test the following body by clicking on Try it Out
deviceid: 1, objectid: 1, frequency: 10, action: Set, plugin: ICMP
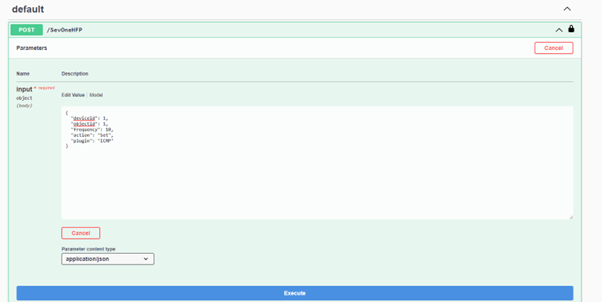
The outcome of this operation should be successful with a 200 code response.
Now if you go back to the NMS, find the device "NMS" (127.0.0.1), edit the device, go to High Frequency Poller, you should see the object IP of Device being monitored every 10 seconds.
